What is project closure?
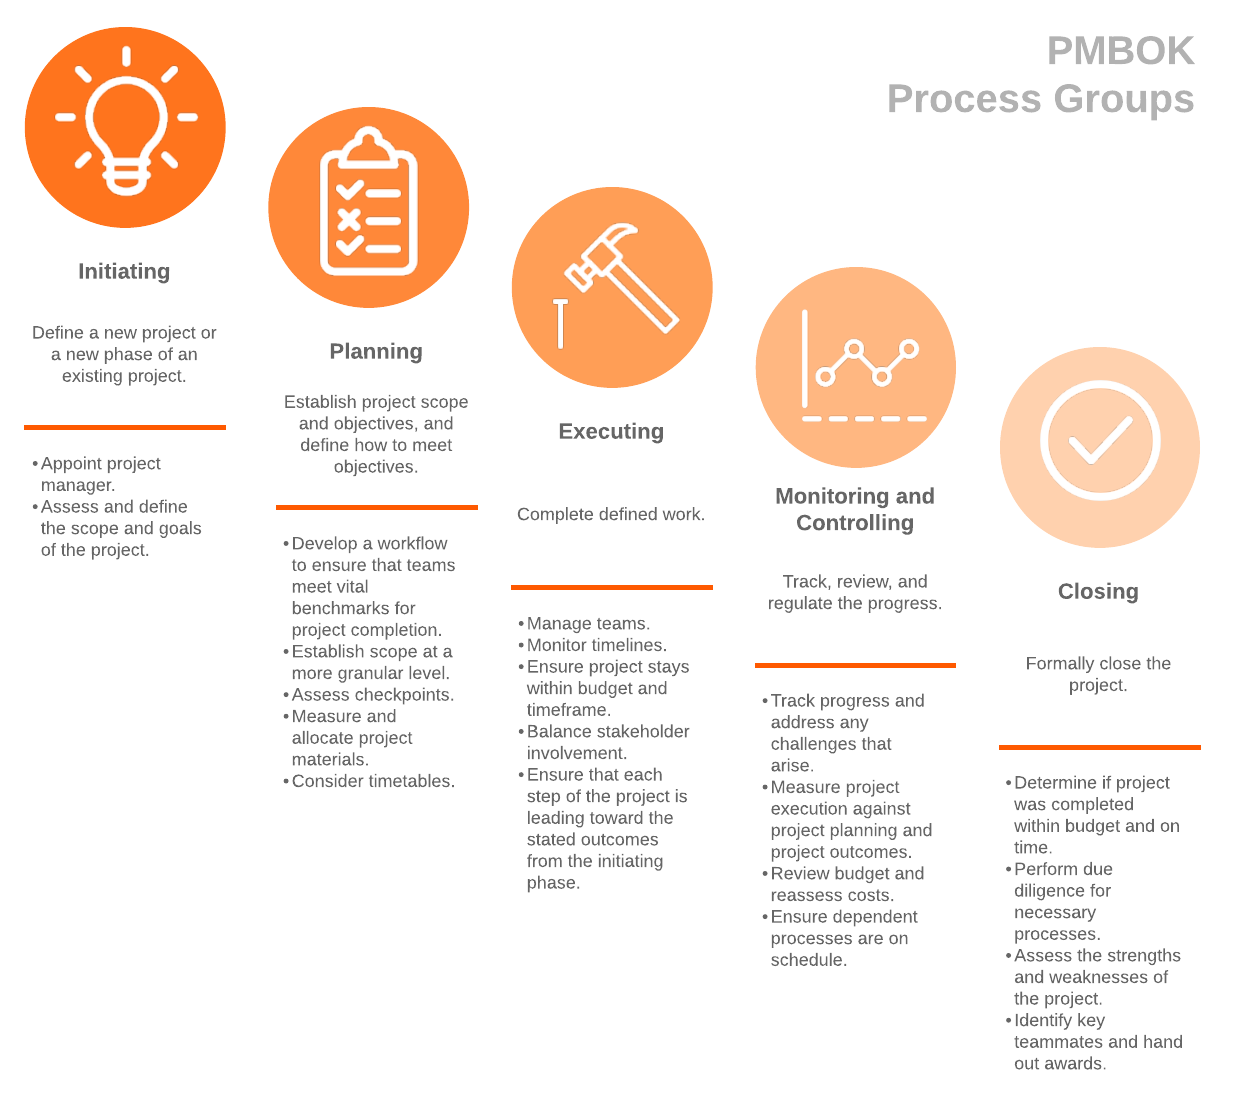
The project lifecycle consists of five groups:
- Initiating process group
- Planning process group
- Executing process group
- Monitoring and controlling process group
- Closing process group
The closing phase of project management is the final phase of the project lifecycle. This is the stage where all deliverables are finalized and formally transferred, and all documentation is signed off, approved, and archived.
The project closure process ensures that:
- All work has been completed according to the project plan and scope.
- All project management processes have been executed.
- You have received final sign-off and approval from all parties.
The project management closure process also gives the team the opportunity to review and evaluate the project’s performance to ensure future projects’ success.
Importance of closing a project
At first glance, it might seem like completing the first four phases of the project lifecycle would be all you need to do to tie up your project and call it good.
However, without a formal closing process, you risk letting crucial details fall through the cracks, which can result in confusion, a never-ending project, dissatisfied clients, and even liability issues.
Project closure helps avoid:
- Repeating mistakes on future projects and objectives
- Having final products or deliverables without dedicated support and resources
- Failing to identify the team or individuals who will own and maintain the solution following final delivery
- Creating liability issues resulting from incomplete payments, contracts, or deliverables
Following a clear project closure plan helps you properly transition your solution to the client or end-user. This process ensures the final stakeholders have the information, resources, and training to successfully manage and use the end product.
The project closure process also ensures the project is formally completed and is no longer considered a project, allowing you to hand the reins over to the correct team in charge of managing and maintaining the project’s outputs.
By officially closing a project, you minimize risks, increase client satisfaction, and ensure all parties are on the same page. In other words, project closure is a process you can’t afford to skip.
7 steps to closing a project
The closing phase of project management involves several steps. Work through the following checklist to ensure your project is successfully completed.
1. Formally transfer all deliverables
The first step to closing out your project is to finalize and transfer the project deliverables to the client. Go through your project plan to identify all deliverables and make sure they have been fully completed and handed off.
2. Confirm project completion
Next, confirm the project is complete. It’s not enough to declare a project done yourself. Each person involved needs to agree on the project’s completion before you can formally close it out and move on.
If you skip this step, you may continue to receive (and be charged for) change requests by the client.
To confirm the project’s completion, obtain approvals for the project deliverables (i.e., all stakeholders must agree that you delivered on all parts of the project plan) with official sign-offs from the project stakeholders.
Be sure to document this step so you have proof that the project close was formally signed off.
3. Review all contracts and documentation
Once you have completed the project hand-off and received approvals from the clients, you can begin closing out your contracts.
Review all the project documentation to ensure all parties have been paid for the work and there are no outstanding invoices.
4. Release resources
Formally release resources from the project, including suppliers, contractors, team members, and any other partners. Notify them of the end of the project, confirm any final payments or obligations, and officially release them so they are free to work on other projects.
5. Conduct a post-mortem
A post-mortem or project review is one of the most valuable steps of the project closure process. This is a time to review the successes, failures, and challenges of the project and identify opportunities for improvement going forward.
As you begin your post-mortem, conduct a performance review of the project. In other words, calculate the project’s performance in terms of cost, schedule, and quality.
Consider these questions:
- Did you stay on budget?
- Did the team members involved manage their time wisely?
- Were there issues with the quality or compromises along the way?
- How closely did the project meet the customer's needs?
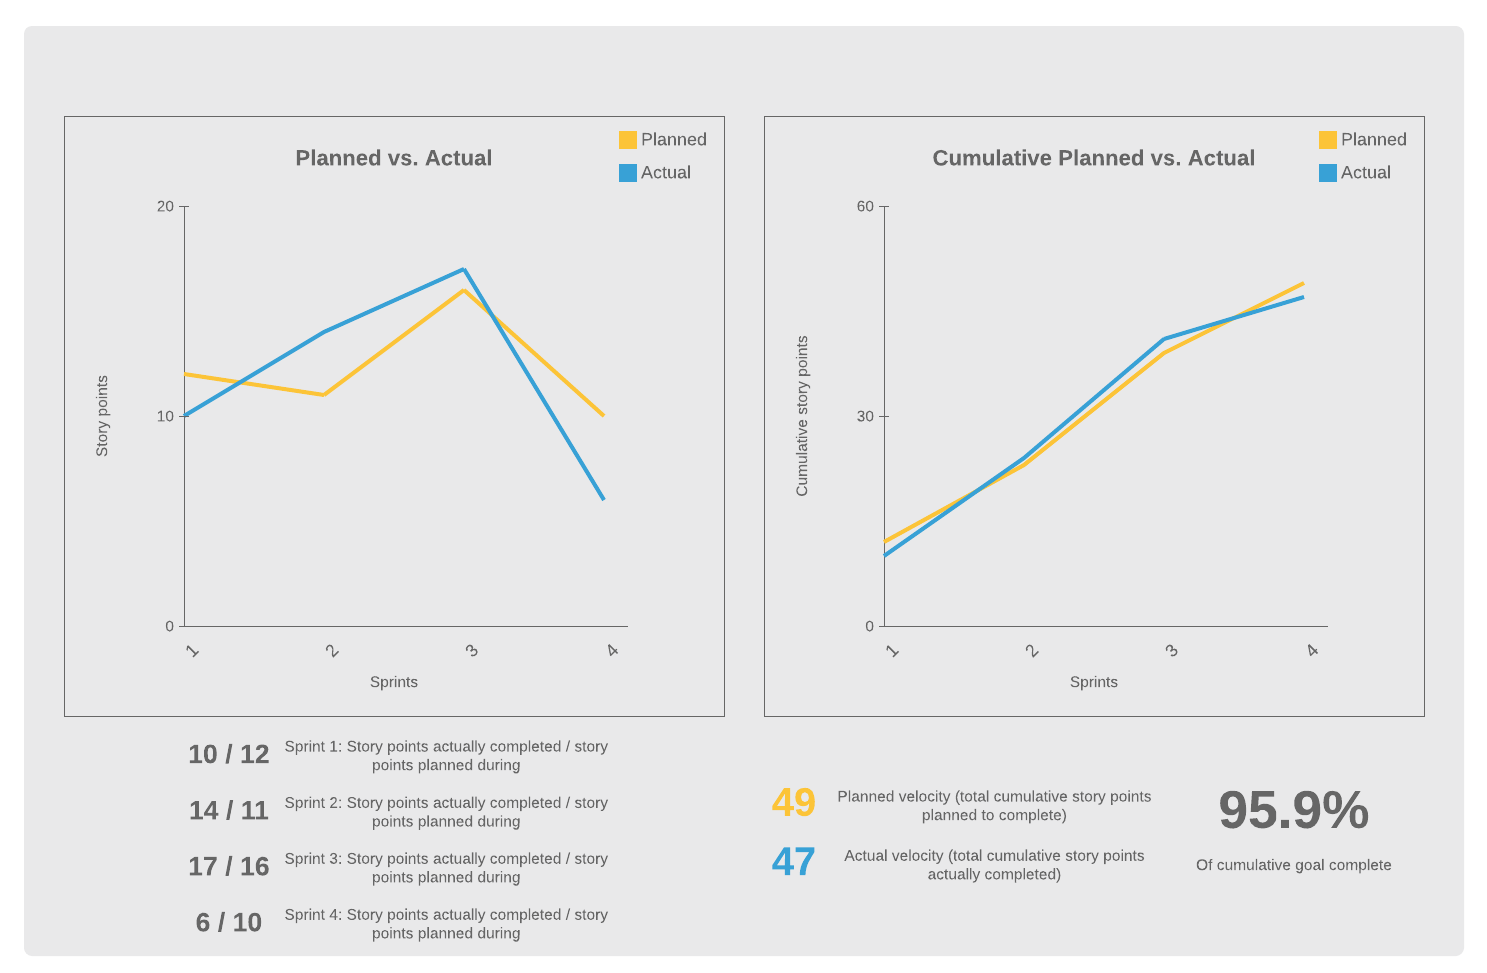
Next, conduct a survey or hold a meeting with the project management team to get feedback on how the project went. These individual answers will help paint a more comprehensive picture of the project’s performance. (If you follow scrum methodology, your team should conduct a sprint retrospective to gather this information.)
Have your team consider the following questions:
- What went well?
- What were the challenges or failures?
- How well did the team communicate?
- Did the team follow the outlined processes and plan?
- Was the client satisfied with the results?
- What would you change or improve for future projects?
With the project performance and feedback in mind, you can then identify lessons learned and opportunities for the future.
Pro tip: Visuals can help you better analyze team performance as well as any roadblocks along the way, so you can execute projects better and faster in the future.